

Colour blends are a great tool to identify geological features from seismic data. The extra information that can be interpreted through visualising three channels of data simultaneously can facilitate the unlocking of previously undiscovered features. It is, however, important to understand the effects of the many types of scaling and data manipulation options available within GeoTeric. Badly scaled data can result in false interpretation or simply not getting the best out of the combined attributes. Understanding the relationship between the data in the three colour channels can significantly enhance the interpretation potential of the blend.
When creating a New Colour Blend, after selecting the three data sources you wish to blend, the next decision is which slice or horizon to preview over. The scale factors will be calculated automatically based on the data in this slice/horizon. If this data is especially low amplitude relative to the rest of the volume you may find the resultant colour blend too saturated in brighter regions away from the chosen slice. This is also a way to ensure that the lower amplitude regions of your data are blended with sufficient colour and brightness.

Figure 1. Colour blend scaling options
Bits per Channels
The “bits per channel” setting relates to data compression for visualisation. Fewer bits per channel will require less disk space, but at the cost of colour resolution. Where disk space is not a concern 7 bits per channel will give the best possible colour resolution for a blend. 6 bits is a good compromise between good colour resolution and disk space.
Contrast Value
The Contrast Value or Contrast Enhance option provides a non-linear scaling to the Colour Blends and should be used to reduce the contrast between light and dark areas in a blend. It is similar to gamma correction and increases the intensity of the lower amplitude values.
This is done by applying the following formula to each channel:
New_val = old_val^pow_val * max_val^(1.0-pow_val)
Where pow_val is the contrast value between 0.1 and 1.0. Max_val is the maximum permissible value in the volume (i.e. 32767 for 16 bit vols).
The first term applies the non-linear function and the second term applies the scaling.

Figure 2. Same colour blend with a contrast value of 1.0 (left) and 0.5 (right)
Pre-Scale
Two automated options and one advanced option are available in order to scale the input volume:
- Max Stretch: Stretch each input channel independently to fill the full dynamic range of the output. This will result in a blend where the mathematical relationship between the channels is not retained, but the balance of colours will often be better.
- Uniform Stretch: Stretch the input channel with the highest dynamic range to fill the full dynamic range of its output channel. Then apply this same scale factor to the other two channels. This will result in a blend which retains the integrity of the exact mathematical relationship between the three data channels. However, the downside of this is that if your three volumes have very different dynamic ranges, some colours may be lost due to being very low amplitude.
- Advanced: Also known as “User defined”, this option gives full control over the exact scale divisors used to compress the three input data sources to RGB output channels. This option is not generally recommended and should ideally only be used when exact values are required. For instance, applying the same scale divisors to a large volume as were previously tuned on a subset.
Using Max Stretch will give us the best possible visual balance of colours. This is the recommended choice if the aims of the colour blend analysis are purely qualitative. Geological features such as channels, carbonate build-ups or stratigraphic features can often be highlighted using this method without needing to be concerned about the exact mathematical relationship between the channels.

Figure 3. Max stretched colour blend (on the left) vs uniform stretched colour blend (on the right)
If a quantitative analysis is required, much closer attention to the true data rather than the visual impact is necessary, so Uniform Stretch will be the choice.
One of the clear situations when Uniform Stretch should be applied is when dealing with angle stacks or 4D vintages, in order to preserve the amplitude relationships in between them.
Post-Scale

Figure 4. Post-scale options.
Compared to pre-scale, post-scale is blissfully simple. Post scale is designed to be user-friendly where pre-scale is designed primarily to compress data appropriately on disk. A newly created or cached colour blend can have its colour balance tuned by altering the post scale values of the three channels. Boosting the post-scale of the red channel to a value of 2.0 will simply double the red component of every voxel. Values which fall outside the data range as a result will be clipped.
The three channels can also be linked so that when modifying the red channel, all the three channels will have the same value, giving a much “brighter” blend.
One advantage of post-scale is that the fine tuning can be done considerably faster than with pre-scale because it does not alter the cached blend.
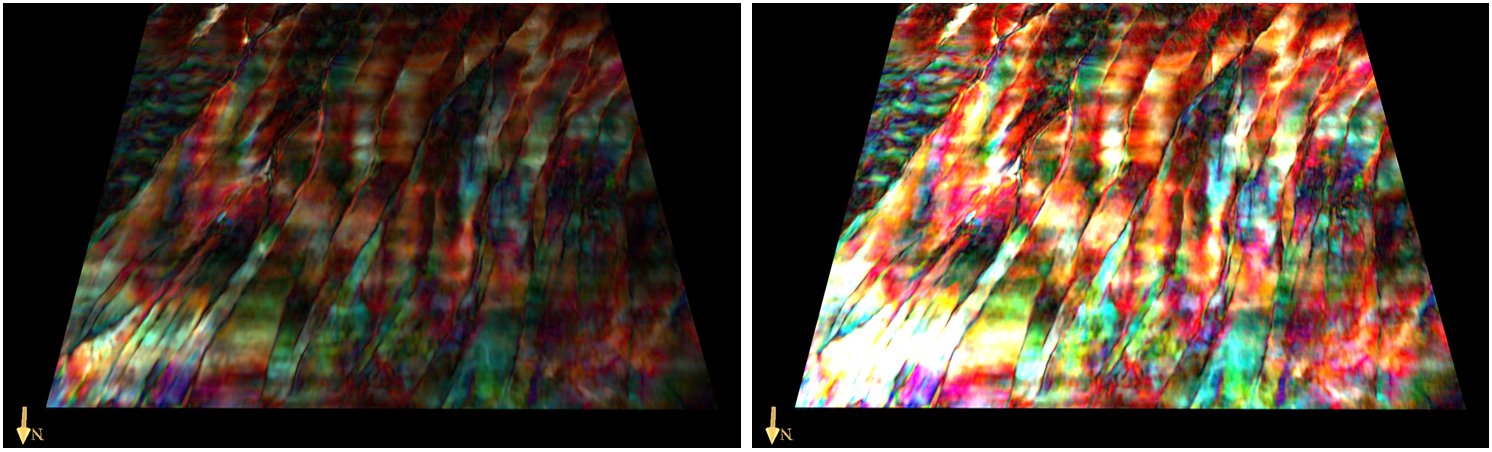
Figure 5. Same blend with a post scale of 1.0 in all the three channels and with a post scale of 3.0 in all the three channels. The post scale can be useful to increase the brightness in dimmer areas.
