

Why should you do your geobody interpretation in Geoteric?
Geoteric’s Adaptive Geobodies changed the paradigm of geobody generation. The tool doesn’t rely on the standard threshold technique, where the user sets an opacity value in order to tell the software which attribute values to ignore.
The Adaptive Geobodies, in Geoteric, uses the unique approach, of a set of interpreter guided Probability Density Functions (PDF), one for each attribute (up to ten), to interrogate the data. The user's experience is used to select the input data clusters, guide the extraction and when the limits of the data are reached (either due to data quality, data content or complexity of the structure) the user can manually manipulate any point of the surface.
The Adaptive Geobodies are in effect, a true 3D interpretation tool that uses a multi-Z surface and gives the interpreter the ability to extract any feature in the data.
What is the Acceptance Level doing?
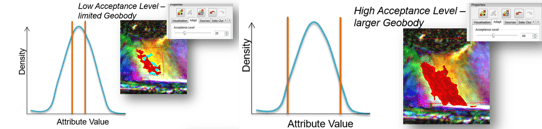
The Acceptance Level sets the fine scale control over the data variability to be included in the Geobody. It alters the acceptance cut-off level symmetrically from the centre of the PDF, hence sets the probability level at which a voxel is accepted as being part of the model. Because the acceptance cut-off levels are symmetrical, only the most dominant values that were selected in the Data Cluster are used, figure 1. This makes the Adaptive Geobodies resistant to noise in the data that may be included in the PDF (noise will be extreme values at the edge of the PDF and therefore not included in the selection criteria).
 |
Figure 1 - Graphic display of the Acceptance Level parameter |
Lowering the Acceptance Level will exclude more data while increasing the Acceptance Level will include more data, figure 2.
 |
||
Figure 2 - Effect of changing the Acceptance Level on the growth of geobody |
When only one attribute is used, the PDF’s and Acceptance Level are the same as defining a value range, when multiple volumes are used to define the Geobody, the data range is much more complex, and simple range definition would include a lot of non-desired values. PDF’s give more accuracy and control over the definition of the data range when multiple attributes are used, especially when multiple data clusters are used to describe the values. The Acceptance Level is the contour line around the data distribution, figure 3.
|
|
|
Figure 3 - Effects on data representation when using an increasing number of attributes/clusters |

The difference between "Closest Cluster" and "All Cluster"?
With the Closest Cluster active, the Geobody will use the information from the cluster closes to the voxel that is being interrogated in order to determine if that voxel should be include in the Geobody or not.
This gives the user the ability to track a response in one portion of the geobody but ignore it in a different portion, figure 4. This is very useful when the attribute response of the structure and/or surrounding area changes laterally.

Figure 4 - Using multiple clusters with different cluster types (Internal & External) |
With the All Clusters option active, the information in all of the clusters are used, independent of their proximity to the voxel that is being interrogated.
How to edit your cluster?
The cluster can be edited in the Data Cluster tab. Data Clusters can be renamed, change the Type (Internal or External), change the colour, Auto-Seed on or off and add or delete cells. For more on how to edit the Data Clusters, please click here.
How to make the geobodies grow faster?
The speed at which the Geobody grows is governed by two factors: the size of the Geobody (the bigger the Geobody the slower the growth) and the Mesh Granularity (the smaller the mesh the slower the growth).
In terms of the size, the Geobody can be extracted in different sections and later combined into one single object. The quickest way to create a Geobody of a large salt body is to extract several smaller Geobodies and then combine them into one. This is done by selecting two or more geobodies, in the project tree, and right click to get access to the menu, figure 5a.
 |
Figure 5 - Combine geobodies using the Adaptive Geobodies right click menu. |
In the menu chose the Combine Geobodies option. This will open a second window (figure 5b) where the user selects a name and choses from which original Geobody the new one will inherit the properties.
The Mesh Granularity specifies the maximum granularity that the mesh is allowed to be, but the adaptive nature of the algorithm means it will sometimes be finer than that if it thinks it needs to be to retain detail. It can never be coarser than you have specified. To increase the number of points representing the model, decrease the Mesh Granularity.
Although increasing the Mesh Granularity will make the Geobody growth faster, the thickness of the feature being extracted must be taken into account. If the feature is very thin the mesh must be kept low in order to track it. To see the effect of changing the Mesh Granularity please watch the video.
How to remove unwanted parts of the geobody?
Removing unwanted parts of the Geobody can be done in two ways:
1. The Geobody Splitting tool
Geobody Splitting allows the interpreter to manually interact with the Adaptive Geobodies to split a Geobody. On activating Splitting, an infinite cutting plane will be displayed in the screen. Pick where you want to split the model by positioning the cutting plane (the plane is define by drawing a line, one click (LMB) to define the start of the line, second click (LMB) to define the end of the line). Please watch the video for a more detailed explanation on how to use the Geobody Splitting tool.
If the option to retain both parts is selected (default option) on the Geobody menu option, Separate can then be selected to output the split Geobody sections as individual Geobodies, figure 6.
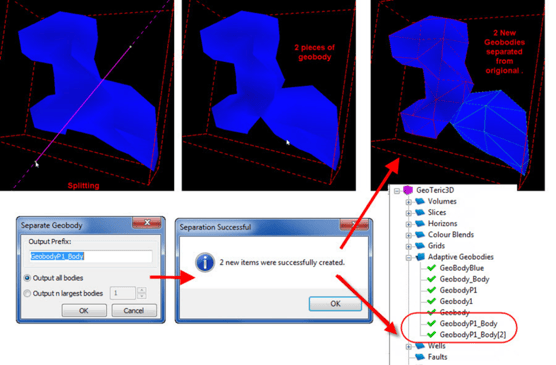 |
Figure 6 - Separating two geobodies |
2. The Geobody Locking tool
This tool gives the user the ability to lock sections of the Geobody surface. If the section that need to be removed is left unlocked and the Acceptance Level is set to zero, the geobody will shrink and that portion will be removed. For a more detailed workflow for using the Locking tool to remove part of a Geobody, please click here.
How to make the geobody track more of the feature?
If on the volume, the colour in question is already represented in the internal cluster it might be just a question of increasing the Acceptance Level, this will allow the Geobody to take more of the represented colour in the PDF.
But if there is a portion of the volume you would like to extract as a Geobody and the colours on the volume are not represented in the original Data Cluster, you can either add those colours to the current Data Cluster by continuing to draw the Data Cluster or a new Data Cluster can be made from the drop down menu in the Adatptive Geobodies Toolbox. In the last case the Use all clustersmust be active in the Adapt tab.
How to make the geobody surface smoother?
By increasing the Mesh Granularity the surface of the Geobody becomes smoother. This is achieved, of course, at the expense of detail. A courser Mesh Granularity will not be able to track in thinner areas and therefore portions of the Geobody may not be extracted, resulting in smaller volumes.
How to edit the geobody surface?
The ability to edit any position of the Geobody surface is one of the most powerful features of the Adaptive Geobody tool. Geobody Manipulation allows for manual interaction with the Adaptive Geobodies to adjust the shape and position by dragging points of the mesh to the desired location. Besides adjusting the desired seismic reflector, the interpreter is able to close gaps between parts of the same Geobody. For a more detailed description on how to use the Geobody Manipulation tool, please click here.
What to do next with your Adaptive Geobodies?
Once the Geobody is created and edited simply click with RMB to open the menu with the available options for your Geobody and options for export. A detailed description of the options can be found by watching the following video.
