Not all geobodies are discrete geological features that can be extracted such as channels or debris flows, sometime more large scale geobodies need to be calculated. This is often the case when analysing large reservoirs where a “tank of sand” model may be applied or if two horizons pinch-out making geobody volumetric estimations difficult. This is an important process as the Gross Rock Volume (GRV) is an essential input to the STOIIP or GIIP calculations. We can increase the accuracy of our GRV estimation with the use of existing horizons and the Adaptive Geobody tool.
STOIIP = Vb * N/G * ɸ * (1 – Sw) * (1/Bo)
STOIIP = GRV * Net/Gross Ratio * Porosity * Oil Saturation * Oil Formation Factor
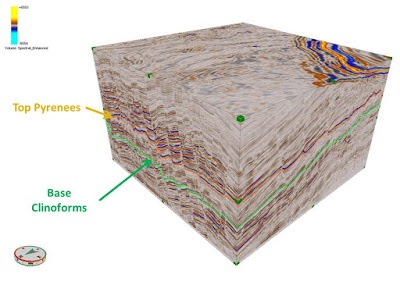
In this example we want to calculate the total GRV for the area between the Top Pyrenees and Base Clinoform horizons. The rest of the STOIIP calculations components are known from previous studies, but trying to get an accurate GRV is the final piece in the jigsaw.
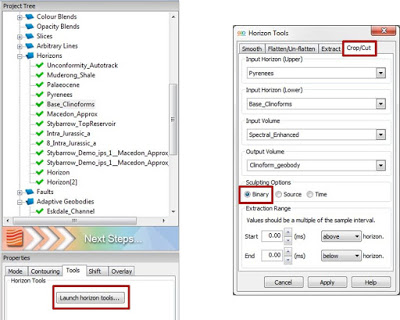
The first step in the process involves making a horizon based geobody. This can be achieved by accessing the Horizons tools by left-clicking on a horizon in the project tree, which will subsequently populate the Properties tab with the horizon options. Select the Tools tab and Launch the horizon tools.
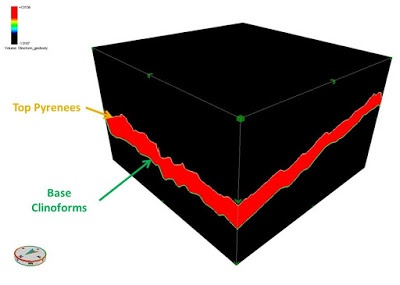
In this window select the crop/cut tab and populate the input horizons and input volume accordingly. It is important to select the Binary sculpting method as this will assign all the voxels between the two horizons as a singular value, thus creating a “geobody” volume.
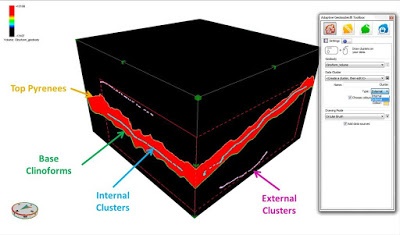
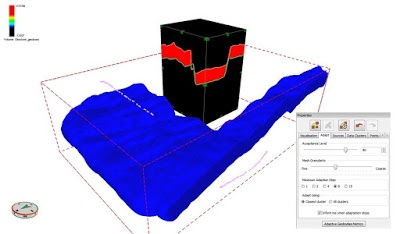
The newly generated Geobody volume can then be used as the source input for the adaptive geobody process. The Adaptive Geobody tool is located in the Interpret workflow tab at the top of the screen or can be access by right-clicking on a volume in the 3D viewer. In the Adaptive Geobody tool it is then possible to select voxels that represent the internal and external response of the geobody feature. The values of these voxels are then processed via a probability density function that searches for other areas in the volume with a similar value. As the geobody volume has assigned the area between the two horizons as a single value it should be possible to easily constrain the growth of the adaptive geobody.
To encourage the growth of the geobody, it is possible to increase the Acceptance level quite significantly. This will not affect the resultant geobody as the value assigned to the internal areas (32767) and the external (-32767) areas are so different. Decreasing the Mesh Granularity can also speed up this process.
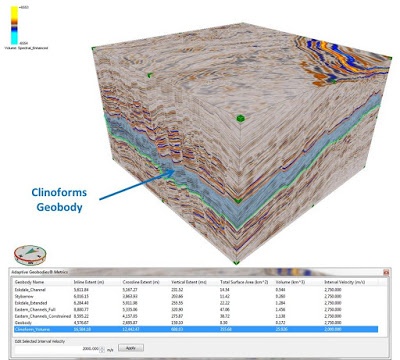
Once the geobody has finished adapting, it is possible to find the volume of the geobody. Clicking on the Adaptive Geobody Metrics tab in the geobody properties window will bring into view the metrics for all existing geobodies in the GeoTeric project. Here it is possible to see values such as the Inline, Crossline and Vertical extent of the geobody along with the total surface area.
The penultimate column will show the volume of the geobody, in this case the GRV for the area of interest. As this is a time project an Internal Velocity value has been assigned to convert the time values to depth. This can be changed or adjusted by left-clicking on the geobody in the table and adjusting the value in the box below.
This workflow allows the user to create large scale geobodies in a short amount of time with a high degree of accuracy that can be used as direct inputs for GRV values for calculating STOIIP or GIIP, ideally but not restricted to stratigraphic pinch-outs.

